Oster Classic 76 Maintenance & Repair
To ensure long lasting, reliable operation, the Oster Classic 76 hair clipper requires routine maintenance. This
is especially true if used daily. Overheating is probably the number one culprit when it comes to clipper failure.
The two most common causes of heat on the Oster Classic 76 is friction and poor airflow through the cooling
vents.
Cooling
A comfortable running temperature can be maintained by making sure the air flow through the clipper is
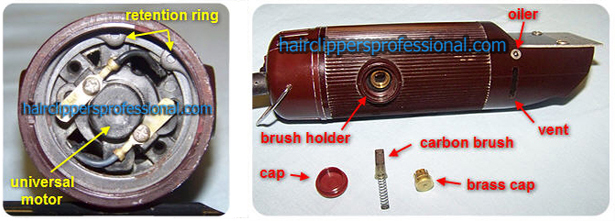
unrestricted. The Oster Classic 76 has venting slots near the gearbox plates and in the end cap switch-housing.
These vents can easily be blown out with a mouth puff of air, blow dryer or canned air.
The current Oster Classic 76 models include a removable air filter vent integrated into the end cap for easier
blow out. Older models from twenty or more years back have a shorter end cap with no removable vent. For both
current and vintage models hair may also be collecting within the end cap and underside of the armature. Remove the
two screws that hold the end cap in place and blow out any additional hair.
Lubrication
The gearbox assembly should be inspected and serviced on a regular basis. Remove the gear box cover plate to
view and access the different parts of the assembly.
If the clipper is making odd sounds like clacking or rapid knocking then the parts may need to be inspected
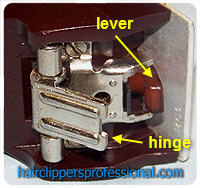
for wear and tear. Using gentle pressure with a needle nose plier, remove all the parts starting with the lever and
inspect for damage.
Some common areas to check for wear and tear would be the corners of the lever, the fiber gear grooves and
whether or not all the parts fit nice and snug together. If the corners on the lever tongue are rounded then it
probably needs replacing. Also be sure to test the fit between the fiber gear and the link. If it is loose fitting
then both of those parts may need to be replaced.
Old or dirty grease should be cleaned out of the gear box compartment. A cotton swab works well for this. Use a
conservative amount of grease when replacing the parts back where they go. Grease should be applied specifically to
the contact or friction areas and the gear post. The proper parts replacement order is washer, fiber gear, link
then lever. Try to avoid dabbing any grease on the felts located on either side of the lever central pivot point.
Instead of grease, oil should be applied to the felts. After all the parts have been re-installed, add additional
grease into the hole of the gear post. Replace the cover plate.

One other area that needs oiling from time to time is the armature gear. Located on the side of the clipper
housing is a small hole capped with a springy ball bearing. Press the ball bearing inward with a fingernail or the
clipper oil dispenser spout to add a drop or two. The hinge should also be inspected to ensure that the blades are
locked in securely. Blade rattling may occur if the hinge screws are loose or the spring mechanism is worn out. If
the hinge no longer has enough tension to lock down the blade then it will need to be replaced. Loose hinge screws
should be tightened without overtightening.
Universal Motor
In addition to proper cooling, the Oster Classic 76 universal motor also requires functioning carbon brush
assemblies. These brushes deliver electrical current to the rotating shaft thus completing the circuit. When the
carbon on the end of the assembly wears out then the motor will cease to run. To check the status of the brushes
remove the plastic brush cap with a flat head screwdriver. Carefully wiggle out the brass cap. Pull out the spring
and carbon brush. The brush needs replacing if the carbon is worn close to the plastic holder portion of the
assembly. Make sure to replace both at the same time.

If there is ever a need to remove the armature assembly from the clipper housing then be sure to use heavy duty
internal snap ring pliers for the retaining ring.
Conclusion
Routine cleaning should be carried out after each hair cutting session to prevent hair and dirt buildup. Moving
parts and blades should be oiled regularly to ensure smooth operation, clean cutting and also for rust prevention.
With proper care and proactive maintenance, you can expect to enjoy years of reliable service from an Oster Classic
76 professional hair clipper.
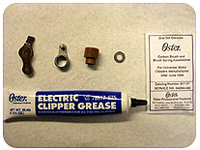
 Oster A5 and 76 Clipper Repair Kit Oster A5 and 76 Clipper Repair Kit

This convenient Oster A5 / Classic 76 repair kit comes with fiber gear, link, lever, carbon brushes and
grease.

|